How to run the setup wizard
A guided first run that checks your environment, offers three starting points, and applies the one you pick in a single request.
The setup wizard is how a new install goes from present to caching. It reads your server environment, shows you what it found, collects your choices, and applies them in one request. It takes about two minutes, and it is permanently re-runnable.
What this does
The wizard is a guided first-run flow, not a settings editor. It answers one question — what should this site start with? — by checking what your server can actually do, offering three opinionated starting points, and then writing the one you choose.
Everything it writes is available afterwards in the per-module panels, and nothing it does is irreversible. Its value is that it puts the six or seven decisions that matter on one screen, in an order that makes sense, before you’ve had to learn where any of them live.
When the wizard opens
Activating xSpeed on a fresh install flags a one-time redirect, and you land on the wizard at your next admin page load. That redirect is deliberately skipped in four cases:
- Bulk activation — you activated several plugins at once, and being pulled out of that flow isn’t what you asked for.
- AJAX and cron requests — there is no page load to redirect.
- Anyone without administrator rights — the wizard writes settings.
- An install another plugin performed on your behalf — it has its own onboarding, and ours would interrupt it mid-flow.
In all four the plugin is installed and working; you simply arrive at the dashboard instead. The wizard is always reachable from xSpeed Cache → Setup Wizard in the menu, at wp-admin/admin.php?page=xspeed-onboarding.
The wizard steps
Four screens, shown in a step rail across the top:
- Environment — a read-only check of WordPress and PHP versions, your server, the cache directory, permalinks and competing cache plugins. Nothing is written.
- Configure — three presets and the individual toggles beneath them, plus cache lifetime and the usage-analytics question. The only screen that writes anything.
- Summary — what the apply actually did, with any server-configuration step you still need to take.
- Connect — an optional invitation to link the site to xSpeed Hub.
If the site is already connected to the Hub, step 4 is dropped and the rail shows three steps, with the summary labelled Done rather than Summary.
Step 1 — Environment
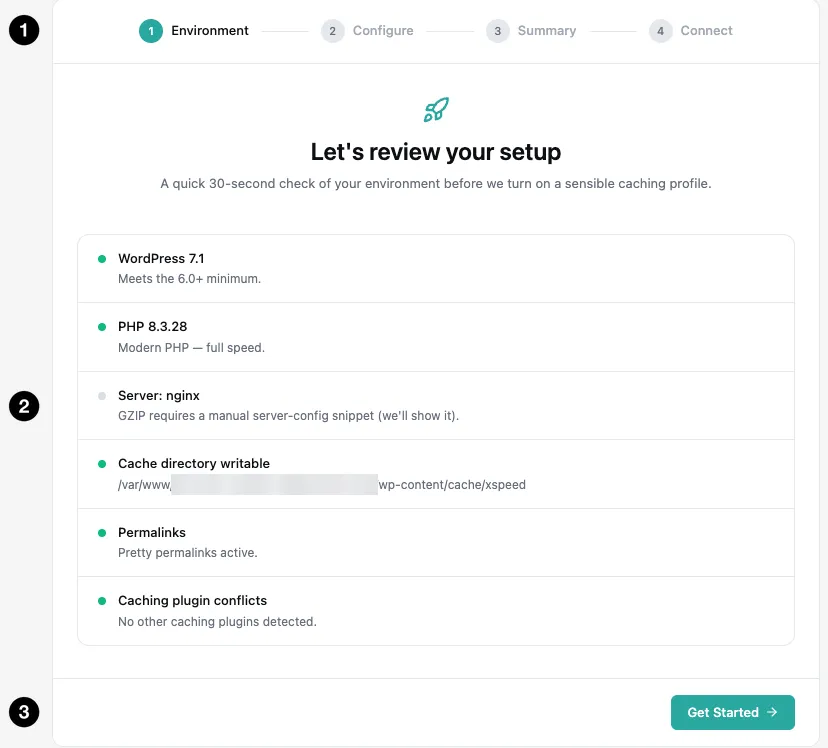
- The step rail — Environment, Configure, Summary, Connect.
- The six checks — read-only, computed on this page load.
- Get Started — moves to the next screen; changes nothing.
The six checks are WordPress version (6.0+), PHP version (7.4 minimum, 8.1+ reads as modern), your server type, whether wp-content/cache/xspeed is writable, whether permalinks are set to anything other than Plain, and whether another plugin owns the page cache.
Two of those rows deserve attention when they aren’t green. The server row is never a failure — it’s information, and what it tells you is how GZIP will be handled: written into .htaccess automatically on Apache and LiteSpeed, or handed to you as a snippet on nginx. A conflict doesn’t block the wizard. It lists what it found — an active caching plugin, or a cache file one left behind — and opens the next screen with page caching unticked, so the wizard never proposes running two caches at once. Its message asks for the other page cache to be off and its advanced-cache.php gone. That’s still the cleanest route, but no longer the only one: the Caching switch in the dashboard can take over another plugin’s cache file, and it names the owner and asks before it does.
Settings the wizard can apply
Step 2 — Configure
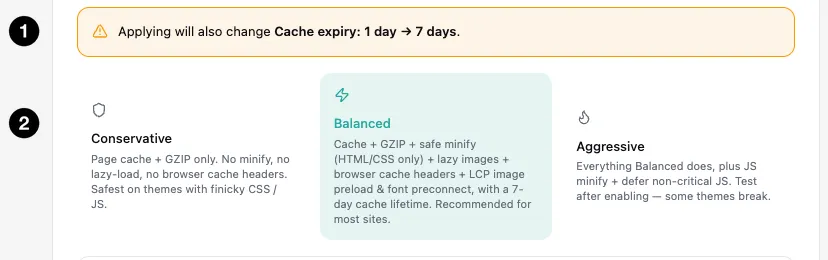
- The warning banner — names exactly what Apply would change.
- Balanced — selected on every run, and the one recommended for most sites.
Three presets fill the toggles below them: Conservative (page cache and GZIP only, 12-hour lifetime), Balanced (the recommended set, 7-day lifetime) and Aggressive (Balanced plus JavaScript minification and defer). Even Aggressive is restrained — it adds exactly two things and stops. Delaying JavaScript until interaction, combining files and removing unused CSS are genuinely riskier and are left to the per-module panels, where proper exclusion lists live. No preset here will reorder or combine your assets.
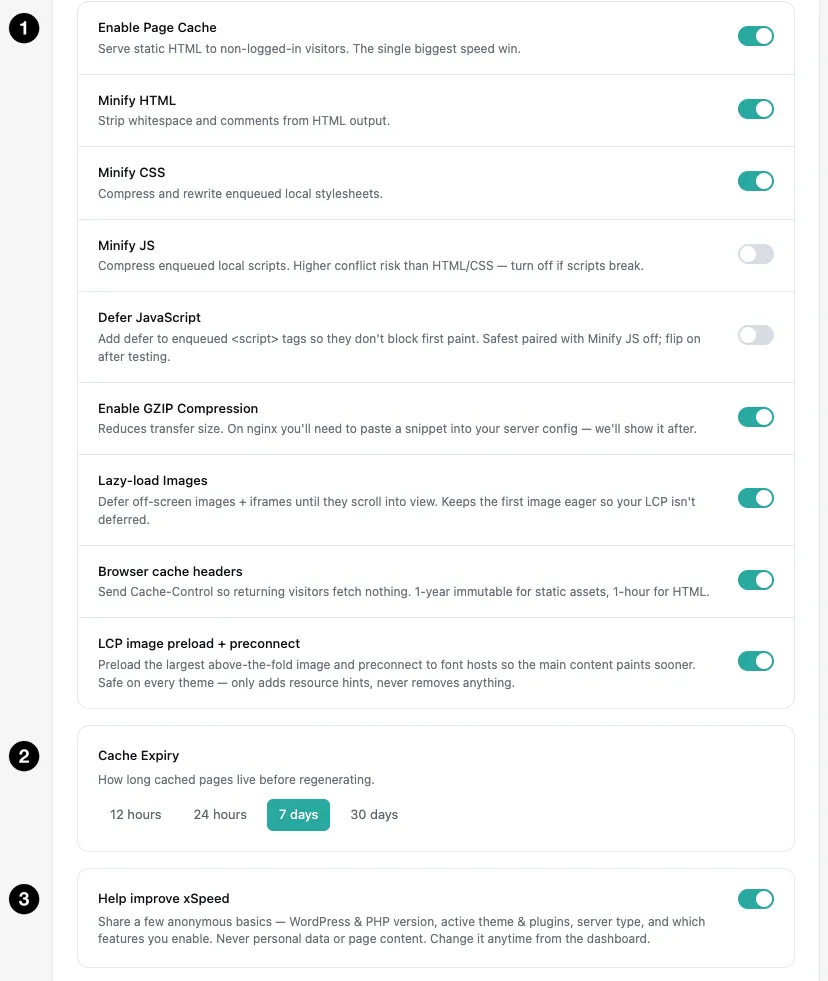
- Nine toggles — the preset fills these; you can change any of them.
- Cache Expiry — four presets, plus your current value if it isn’t one of them.
- Help improve xSpeed — anonymous usage data, pre-ticked and confirmed on Apply.
| Setting | What it does | Default in the wizard |
|---|---|---|
| Enable Page Cache | Serve static HTML to visitors who aren’t logged in. The single biggest win. | On |
| Minify HTML | Strip whitespace and comments from the HTML output. | On |
| Minify CSS | Compress and rewrite enqueued local stylesheets. | On |
| Minify JS | Compress enqueued local scripts. Higher conflict risk than HTML or CSS. | Off |
| Defer JavaScript | Add defer to enqueued scripts so they don’t block first paint. | Off |
| Enable GZIP Compression | Reduce transfer size. Automatic on Apache; a pasted snippet on nginx. | On |
| Lazy-load Images | Defer off-screen images and iframes, keeping the first image eager. | On |
| Browser cache headers | Cache-Control headers — a year for static assets, an hour for HTML — so returning visitors fetch nothing. | On |
| LCP image preload + preconnect | Preload the largest above-the-fold image and preconnect to font hosts. | On |
| Cache Expiry | How long cached pages live before regenerating. | 7 days |
Cache Expiry offers 12 hours, 24 hours, 7 days and 30 days. The underlying setting accepts anything from 1 to 720 hours, so a site already on a value outside those four — 48 hours, say — sees it appear as a fifth button rather than leaving every button unselected.
💡 Usage analytics is a question, not a setting. Help improve xSpeed is asked afresh on every run and never read back from storage. It arrives pre-ticked, and nothing is sent until you click Apply & Continue — untick it first and the tracker stays dormant with no outbound request. It remains reversible from AI Privacy afterwards.
What “apply” does
Pressing Apply & Continue does all of the following in a single request, so the wizard never leaves your site half-applied:
- Writes the minification, compression, lazy-loading, browser-cache and resource-hint settings through each module’s schema-validated store.
- Writes your cache lifetime to the Page Cache module.
- Records your usage-analytics choice — data only begins sending if you left it ticked.
- Enables or disables page caching, which is what installs
wp-content/advanced-cache.php, setsWP_CACHEinwp-config.php, and writes the server rewrite. - Regenerates the nginx server block afterwards, so the snippet you’re shown on the next screen matches the configuration you just applied rather than the one before it.
Step 3 — Summary
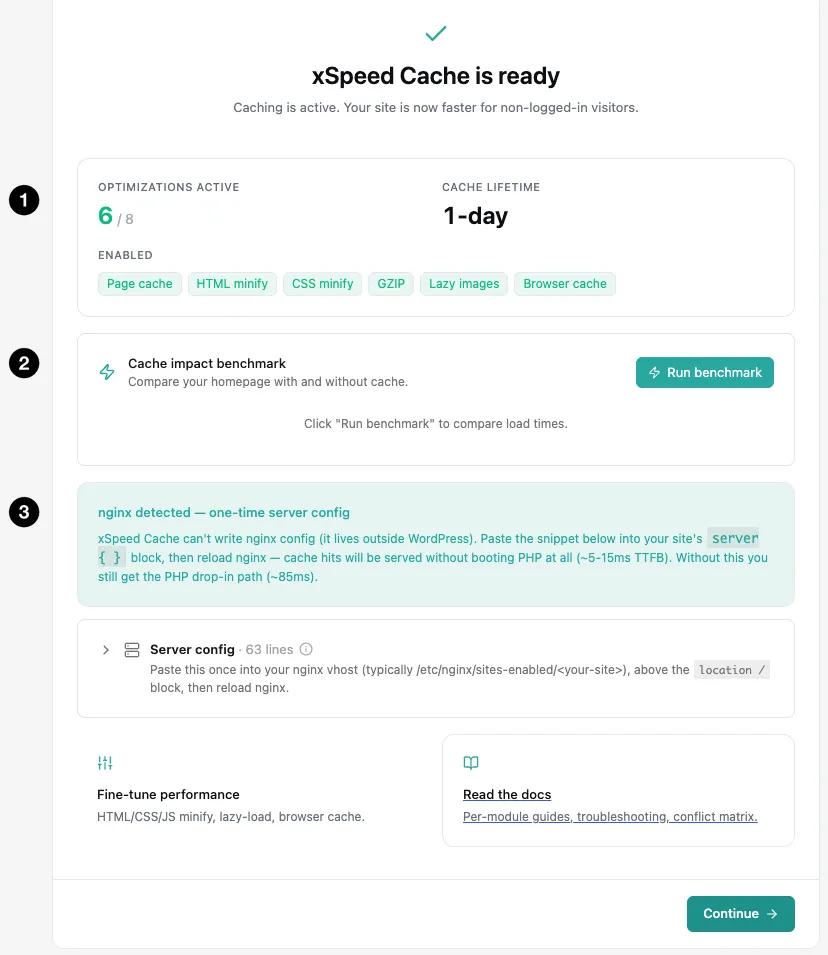
- Optimizations active — the count, your cache lifetime, and a chip per enabled feature.
- Cache impact benchmark — measures your home page with and without cache, on demand.
- A conditional block — here, the one-time nginx server config.
The Summary reports what happened rather than what was intended. Two numbers lead — how many of the eight wizard optimisations are now active, and your cache lifetime — followed by a chip per enabled feature. Cache impact benchmark sits beneath them and does not run on its own: press Run benchmark and it fetches your home page twice, once normally and once with cache deliberately bypassed. Both requests go to your own site.
Then up to three conditional blocks, each telling you about a limit the wizard hit rather than quietly absorbing it. Page cache was not enabled names the reason it was refused — usually a cache file xSpeed can’t read, or a write that failed — and your other preferences were still saved. One manual step appears when wp-config.php isn’t writable, with the single WP_CACHE line to paste. nginx detected gives you the server block, with the snippet itself in a collapsed Server config panel below; until you paste it and reload nginx, hits are served by the PHP drop-in at roughly 85 ms instead of 5–15 ms.
A blocked page cache is not a failed wizard — everything else you chose was applied and is working. Only the switch that needs exclusive ownership of advanced-cache.php was refused, and the screen says why.
Step 4 — Connect
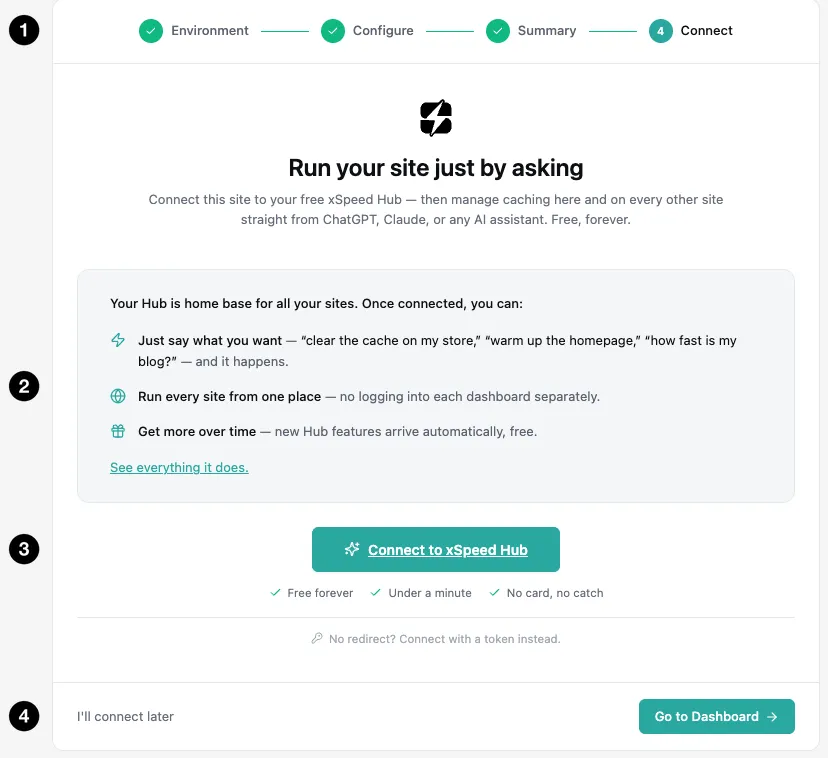
- The step rail — all three earlier steps complete.
- What connecting gets you — the three capabilities, with a link to the full list.
- Connect to xSpeed Hub — starts the flow; a token route sits underneath for sites that can’t redirect.
- I’ll connect later — leaves for the dashboard, changing nothing.
Optional, and last on purpose. Connecting lets you manage caching across every site you run from one place, and lets a single AI connection operate all of them. It used to be the first screen, which asked people to connect an account before the plugin had demonstrated anything; it now arrives after you’ve seen the cache working. Caching is fully functional without it, and the same connection is available any time from the MCP panel.
Re-running the wizard
The wizard stays in the menu permanently, under xSpeed Cache → Setup Wizard, and running it again is the fastest way to reset a site to a known-good starting point.
There is one thing to understand before you do. It always opens on Balanced, whatever you currently have configured — the presets are a recommendation engine, not a view of your site — so Apply on a tuned site will overwrite settings you chose deliberately.
The screen guards against that rather than hiding it: before you click, a warning banner names every currently-enabled option Apply would switch off, every off one it would switch on, and any value it would change. If the banner is absent, nothing differs and applying is a no-op. If it lists something you want to keep, switch it back on in the toggles below before applying — or leave via Skip — I’ll configure manually, which applies no settings at all.
Best practices
- Read the warning banner before every Apply, especially on a re-run. It is the only thing standing between a preset and a configuration you spent time on.
- Start on Balanced and leave the JavaScript toggles off. Minify JS and Defer JavaScript are the two changes most likely to break a theme; turn them on afterwards, one at a time, and check the site.
- Don’t skip the server snippet on nginx. It is a one-time paste and it is the difference between roughly 85 ms and 5–15 ms on every cached hit.