How to connect Cloudflare
Let xSpeed purge Cloudflare's edge cache when it purges its own, control your zone's cache level and browser TTL, and optionally cache HTML at the edge with APO.
If Cloudflare sits in front of your site, you have two caches — xSpeed’s and Cloudflare’s edge. Clearing one doesn’t clear the other, so publishing a post can leave visitors seeing the old version from the edge long after your own cache is fresh. Connecting the two fixes that, and lets you manage some Cloudflare settings without leaving WordPress.
Where to find it
- In your WordPress admin, click xSpeed Cache in the left menu.
- In the xSpeed Cache sidebar, open the Network group.
- Click the Cloudflare card.
Shortcut: open
wp-admin/admin.php?page=xspeed#/network/cloudflaredirectly.✅ This panel is part of xSpeed Cache (Free). Its APO section needs a paid Cloudflare plan.
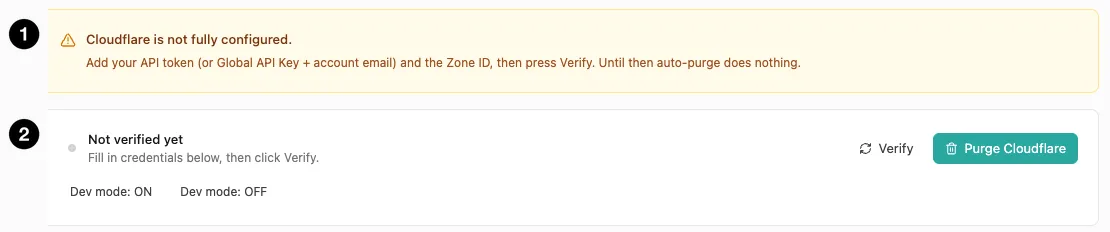
- Configuration notice — what’s still missing.
- Verification status — with Verify, Purge Cloudflare, and dev-mode controls.
Settings at a glance
| Setting | Default | What it does |
|---|---|---|
| Enable Cloudflare integration | Off | Use the credentials below to verify and purge. |
| Authentication | API Token | Token (recommended) or legacy Global API Key. |
| API Token | Empty | Scoped token from your Cloudflare profile. |
| Account Email | Empty | Only for Global API Key auth. |
| Global API Key | Empty | Legacy full-access key. |
| Zone ID | Empty | 32-character hex ID from your domain overview. |
| Auto-purge on xSpeed purge | On | Clear Cloudflare whenever xSpeed clears itself. |
| Cache level | Aggressive | Cloudflare’s zone-level cache level. |
| Browser cache TTL | 14400 s | Cloudflare’s browser cache TTL. |
Only Enable Cloudflare integration is shown at first. Every credential field below it is gated on that switch and isn’t rendered until it’s on — the screenshots here show the panel in its enabled state. The APO section is separate and stays visible either way.
How it works
xSpeed talks to Cloudflare’s API on your behalf. Once credentials are verified it can purge the edge cache, read and push zone settings, and toggle development mode.
Until you verify, auto-purge does nothing. The panel says so plainly in its notice — credentials that are present but unverified aren’t used. Fill them in, press Verify, and confirm the status changes before relying on any of it.
Credentials
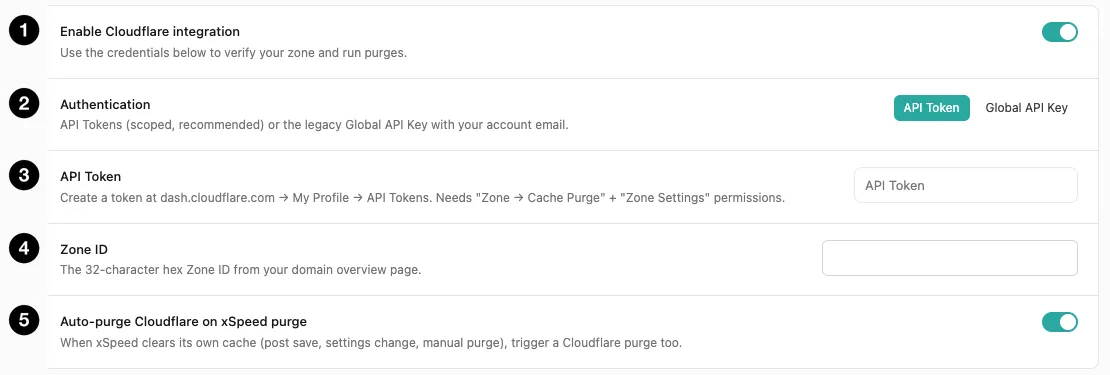
- Enable Cloudflare integration — the master switch.
- Authentication — API Token or Global API Key.
- API Token — the scoped credential.
- Zone ID — which domain to act on.
- Auto-purge on xSpeed purge — keep the two caches in step.
Use an API Token, not the Global API Key
Both work. They are not equally safe.
| API Token | Global API Key | |
|---|---|---|
| Scope | Only the permissions you grant | Full access to your entire Cloudflare account |
| Revocable individually | Yes | No — rotating it breaks everything using it |
| Needs your email | No | Yes |
A Global API Key can do anything your Cloudflare login can, across every domain in the account. Storing that in a WordPress database — where any admin-level user or a compromised plugin could read it — is a meaningful risk.
Create a token instead, at dash.cloudflare.com → My Profile → API Tokens. It needs exactly two permissions:
- Zone → Cache Purge
- Zone Settings
That token can clear your cache and adjust cache settings. It cannot touch DNS, billing, or any other domain.
🔒 Treat these as credentials. They’re stored in your WordPress database, so admin access is equivalent to holding the token. Prefer a scoped token, and revoke it at Cloudflare if you ever suspect exposure.
If you use the Global API Key instead
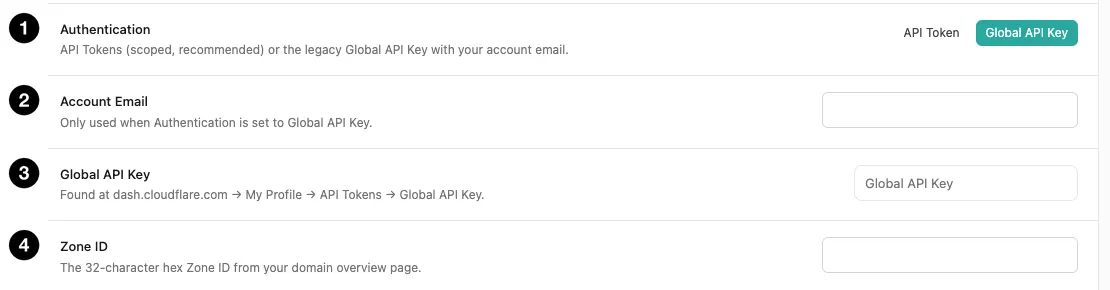
- Authentication — switched to Global API Key.
- Account Email — your Cloudflare login email.
- Global API Key — the legacy key.
- Zone ID — unchanged between modes.
Switching Authentication swaps the field set. The API Token field disappears and two take its place:
- Account Email — the email you sign into Cloudflare with. Only used in this mode; the token path doesn’t need it, because a token identifies itself.
- Global API Key — found at
dash.cloudflare.com→ My Profile → API Tokens → Global API Key.
Zone ID stays in both modes, since it identifies which domain to act on rather than how you authenticate.
Your token settings aren’t lost when you switch — the two credential sets are stored separately, so switching back restores what you had.
🔒 Two credentials instead of one, and both more dangerous. This mode stores your Cloudflare login email and a key with full account access in
wp_options. Together they’re enough to sign into the API as you, across every domain in the account. Use it only if scoped tokens genuinely aren’t an option for you.
Zone ID
The 32-character hex ID for your domain, on its Cloudflare overview page. It identifies which zone to act on — an account with several domains has a different Zone ID for each, and pointing at the wrong one purges someone else’s site.
Auto-purge
On by default, and the main reason to connect at all. When xSpeed clears its own cache — after a post save, a settings change, a manual purge — it triggers a Cloudflare purge too. That’s what keeps the two layers from disagreeing.
Automatic edge purges, and ones run from WP-CLI, record their outcome in the activity log — “Purged the Cloudflare edge cache”, or “Cloudflare purge failed” with Cloudflare’s reason. A purge that couldn’t reach the edge is no longer something you’d only discover from a stale page.
Purge Cloudflare at the top of the panel clears the edge cache on demand. Dev mode: ON / OFF toggles Cloudflare’s development mode, which bypasses the edge entirely for three hours — useful while actively changing a theme, since you see your real output rather than a cached copy.
Cache level, browser TTL, and APO
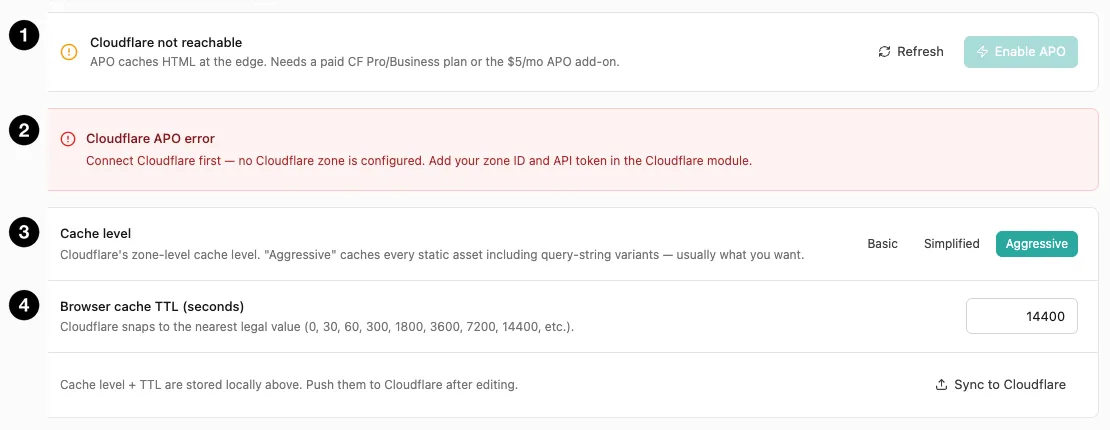
- APO availability — whether your plan supports it.
- APO status — errors surface here.
- Cache level — Cloudflare’s zone-level setting.
- Browser cache TTL — what Cloudflare tells browsers.
Cache level doesn’t mirror Cloudflare’s zone setting so much as be it — xSpeed passes your choice straight through to Cloudflare’s cache_level API. So these are Cloudflare’s behaviours, listed here under both names:
| Level | Cloudflare calls it | Behaviour |
|---|---|---|
| Basic | No Query String | Serves from cache only when the URL carries no query string at all. |
| Simplified | Ignore Query String | Ignores the query string — one cached copy answers every variant. |
| Aggressive (default) | Standard | Caches every static asset including query-string variants — usually what you want. |
Browser cache TTL is what Cloudflare tells browsers, and it snaps to the nearest legal value — Cloudflare only accepts specific numbers (0, 30, 60, 300, 1800, 3600, 7200, 14400, and so on). Enter something else and it rounds rather than erroring. The field itself accepts 0–31536000 seconds (up to a year).
Both are stored locally first. Editing them changes xSpeed’s copy; Sync to Cloudflare pushes them to your zone. That two-step is deliberate — you can stage changes without touching the live zone until you’re ready.
APO
Automatic Platform Optimization caches your HTML at Cloudflare’s edge, not just static assets. That’s a much bigger win, because a visitor can get a complete page from a nearby edge without your server being involved at all.
It requires a paid Cloudflare Pro or Business plan, or the $5/month APO add-on. On a free plan the panel shows “Cloudflare not reachable” and the Enable APO button stays disabled — that’s a plan limitation, not a fault.
⚠️ APO changes what your hit ratio means. With HTML cached at the edge, most requests never reach your origin — so Page Cache’s hit ratio is labelled origin and counts only what got through. A low-looking number isn’t a problem; it means the edge is doing its job.