How to enable Redis or Memcached
Give WordPress a persistent object cache so database query results survive between requests — connect Redis or Memcached with one click, or configure the connection by hand.
WordPress caches database results in memory while it builds a page — then throws them away. The next visitor’s request starts from nothing and re-runs the same queries. A persistent object cache keeps those results in Redis or Memcached so they survive between requests, which is the biggest win available to sites that are database-heavy rather than traffic-heavy: WooCommerce stores, membership sites, anything with complex queries.
Where to find it
- In your WordPress admin, click xSpeed Cache in the left menu.
- In the xSpeed Cache sidebar, open the Cache group.
- Click the Object Cache card.
Shortcut: open
wp-admin/admin.php?page=xspeed#/cache/object-cachedirectly.✅ This panel is part of xSpeed Cache (Free).

- Status — whether a persistent cache is active, and what your server supports.
- One-click setup — test the connection, then let xSpeed do the wiring.
Settings at a glance
| Setting | Default | What it does |
|---|---|---|
| Backend | Redis | Which cache server you intend to use. |
| Redis Host | 127.0.0.1 | Hostname or IP of the Redis server. |
| Redis Port | 6379 | Range 1–65535. |
| Redis User | Blank | Only for Redis 6+ ACL users. |
| Redis Password | Blank | Leave blank if Redis runs without auth. |
| Redis Database | 0 | Logical DB number, 0–15. |
| Memcached Host | 127.0.0.1 | Shown only when Backend = Memcached. |
| Memcached Port | 11211 | Range 1–65535. |
| Cache Key Prefix | Blank | Salt that isolates this site’s keys. |
| Connection Timeout | 1 s | How long to wait for a connection. |
| Persistent Connections | On | Reuse connections across PHP requests. |
The Redis and Memcached fields are mutually exclusive — the panel shows only the set matching your chosen Backend. On a managed host, some of these may already be set for you in wp-config.php and appear read-only — see Settings defined in wp-config.php below.
How it works
WordPress keeps database results in memory only for the life of a single request. A persistent object cache moves that store into Redis or Memcached, which keeps running between requests — so the next request reuses results instead of re-querying.
Enabling it installs an object-cache.php drop-in into wp-content/ and adds connection constants to your wp-config.php. WordPress then routes its cache API through your cache server automatically; no theme or plugin changes are needed.
Start here: check the status
The top card tells you two separate things, and it’s worth reading carefully before you touch anything:
- Whether a persistent object cache is active. “No persistent object cache” means WordPress is using its built-in in-memory cache, which resets on every request — so nothing is actually persisting.
- What your server can support. A Redis ready badge means the native
phpredisextension was detected, which is the fastest path. Without a badge here, your host doesn’t have a cache server available and nothing else on this panel will help — that’s a hosting question, not a settings one.
Re-detect re-runs the check, which is what you want after your host enables Redis for you.
Two states on that card are worth recognising, because both look like a working cache at first glance:
- Connected, but storing nothing. The connection succeeds but the server refuses every write, so nothing is ever cached. On managed hosting this is almost always a Cache Key Prefix that doesn’t match the namespace your host granted — see that section below.
- Another plugin owns the object-cache drop-in. xSpeed will not overwrite or remove another plugin’s
object-cache.php. Turn that plugin’s object cache off first, then enable xSpeed’s.
💡 This is the opposite of Page Cache, on purpose. Turning Page Cache on can take over another plugin’s
advanced-cache.phponce you confirm. The object cache never does — its drop-in stays with whoever installed it.
The easy path: one-click setup
If the status card says your server is ready, use One-click setup and skip the manual configuration entirely.
Test connection tries to reach the cache server with your current settings and reports back. Always do this first — it’s the difference between finding out now and finding out via a broken site.
Enable object cache then does the wiring for you: it writes the object-cache.php drop-in into wp-content/ and adds the necessary constants to your wp-config.php. No manual file editing, no pasting snippets.
💡 Test before you enable. If the connection fails after the drop-in is in place, WordPress tries to reach a cache server that isn’t answering on every request. Testing first turns a potential outage into a message on screen.
Connection settings
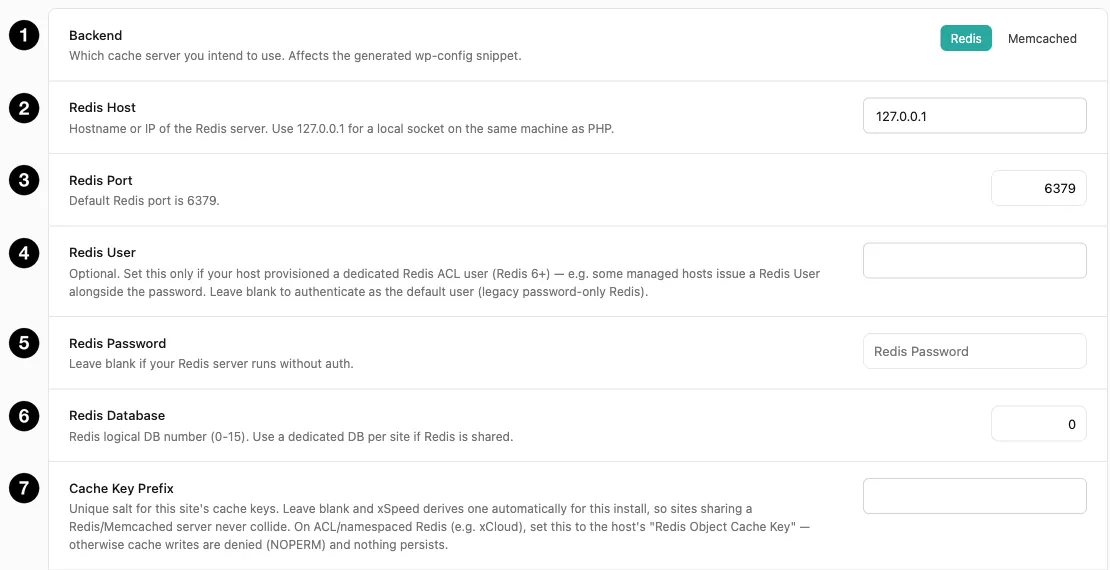
- Backend — Redis or Memcached.
- Redis Host —
127.0.0.1for a server on the same machine. - Redis Port — 6379 by default.
- Redis User — only for Redis 6+ ACL setups.
- Redis Password — blank if your server has no auth.
- Redis Database — 0–15, to separate sites sharing one server.
- Cache Key Prefix — the salt that isolates this site’s keys.
Most of these you’ll never change. 127.0.0.1 and 6379 are correct whenever Redis runs on the same machine as PHP, which is the common case.
Redis User is the one people get wrong. Leave it blank unless your host explicitly issued you a Redis ACL user (a Redis 6+ feature). Legacy password-only Redis authenticates as the default user, and putting something here will break that.
Redis Database (0–15) matters when several sites share one Redis server: give each its own number and they can’t tread on each other.
Using Memcached instead
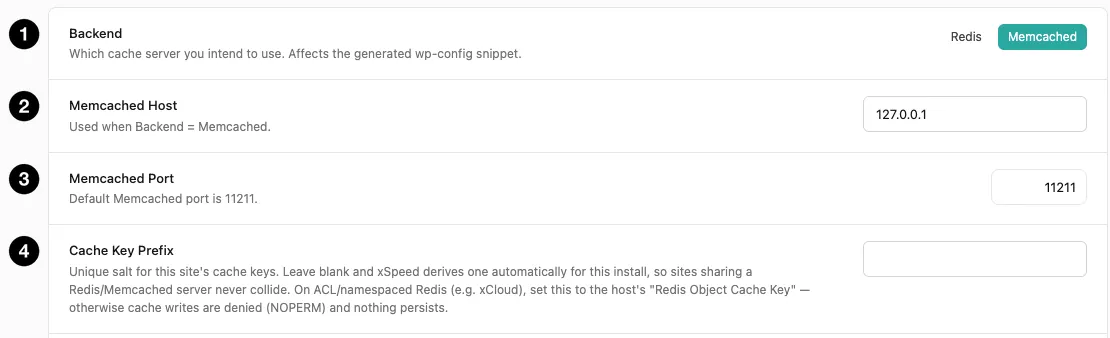
- Backend — switched to Memcached.
- Memcached Host —
127.0.0.1for a server on the same machine. - Memcached Port — 11211 by default.
- Cache Key Prefix — same role as with Redis.
Switch Backend to Memcached and the form changes: the Redis fields disappear and two Memcached fields take their place. There are only two, because Memcached has no equivalent of Redis’s user, password, or database-number options — it’s a simpler protocol with no built-in authentication and no logical database separation.
That last point used to matter a great deal: with no database numbers to separate them, sites sharing one Memcached server depended entirely on each one setting a Cache Key Prefix. They no longer do. Every site’s cache keys are now namespaced automatically, whichever backend you use, so sites sharing a server can’t read or purge each other’s entries even with the prefix left blank.
If your host already configures Memcached through the standard $memcached_servers array in wp-config.php, xSpeed reads the host and port straight from it.
| Redis | Memcached | |
|---|---|---|
| Default port | 6379 | 11211 |
| Authentication | Optional password, plus ACL users on Redis 6+ | None |
| Separating sites | Automatic — plus a database number or key prefix if you want | Automatic — plus a key prefix if you want |
| Recommended? | Yes, if available | Only if Redis isn’t offered |
Because the two field sets are mutually exclusive, your Redis settings aren’t lost when you switch — they’re stored separately and reappear if you switch back.
Cache Key Prefix — read this if your host is managed
On an ordinary server, leave it blank. The prefix is the salt that keeps this site’s cache keys apart from every other site’s. Left empty, xSpeed uses one unique to this install — WordPress’s own WP_CACHE_KEY_SALT if your wp-config.php defines one, as nearly every install does, or otherwise one derived from the site address, database name and table prefix. Either way, sites sharing a server never collide.
On ACL-namespaced Redis, it must match your host’s value. On hosts such as xCloud, Redis only allows writes inside a namespace the host assigns, often shown as “Redis Object Cache Key”. A prefix that doesn’t match gets every write refused with a NOPERM error and nothing persists. That is exactly what the status card reports as Connected, but storing nothing — the connection tests fine, yet the cache never fills.
Most managed hosts write that value into wp-config.php as WP_REDIS_PREFIX, and xSpeed picks it up on its own — the field shows it as defined there rather than asking you to paste it. If your host only displays the key in its dashboard, copy it into this field.
💡
WP_CACHE_KEY_SALTnever locks this field. Nearly every WordPress install defines it with a random value, so it isn’t treated as a namespace your host chose — the field stays blank and editable. It’s still honoured as the salt at runtime when nothing more specific is set.
Advanced settings

- Connection Timeout — how long to wait before giving up.
- Persistent Connections — reuse connections across requests.
Connection Timeout defaults to 1 second, and low is correct. This is the time WordPress waits for the cache server before giving up. If the cache is unreachable, a short timeout means a brief stumble; a long one means every page hangs for that duration. Keep it at 1–2 seconds so a misconfigured cache can never stall your site.
Persistent Connections is on by default and generally a win — reusing a connection across PHP requests avoids the handshake each time. Turn it off only if your cache server complains about idle connections piling up.
Settings defined in wp-config.php
Managed hosts often configure Redis for you by writing constants into wp-config.php before you ever open this panel. xSpeed reads them, and a field set that way is shown read-only, with a note naming its source — “Defined in wp-config.php as WP_REDIS_HOST”. That’s deliberate: the host’s value is what the drop-in is actually using, so letting you type a different one here would make the panel disagree with the site.
For each field, the first of these that is defined wins; if none is, your saved value is used, then the default:
| Field | Read from |
|---|---|
| Redis Host | XSPEED_OC_HOST, WP_REDIS_HOST |
| Redis Port | XSPEED_OC_PORT, WP_REDIS_PORT |
| Redis User | XSPEED_OC_USER, WP_REDIS_USER, or WP_REDIS_PASSWORD in its two-part user-and-password form |
| Redis Password | XSPEED_OC_PASSWORD, WP_REDIS_PASSWORD |
| Redis Database | XSPEED_OC_DATABASE, WP_REDIS_DATABASE |
| Memcached Host / Port | The $memcached_servers array, then XSPEED_OC_MC_HOST / XSPEED_OC_MC_PORT |
| Cache Key Prefix | XSPEED_OC_SALT, WP_REDIS_PREFIX |
| Connection Timeout | XSPEED_OC_TIMEOUT, WP_REDIS_TIMEOUT |
| Persistent Connections | XSPEED_OC_PERSISTENT, WP_REDIS_PERSISTENT |
XSPEED_OC_* are xSpeed’s own names, and they win over the WP_REDIS_* names other Redis plugins use. A constant defined as an empty string still counts: on a server with no Redis password, WP_REDIS_PASSWORD set to '' is an answer, not a gap for a saved value to fill.
A save that tries to change a defined field is refused with a message naming the constant, so you always know where the real value lives.
💡 Only this panel works this way. In this release the Object Cache connection fields are the only settings in xSpeed that read
wp-config.phpconstants. Every other panel stores its settings as normal.
Managing a defined setting here instead
Click the pencil beside a read-only field to take it over. xSpeed asks first — “Manage this setting here?” — and spells out the trade: once you manage it here, later changes your host makes to that constant are ignored. On a managed host such as xCloud or Cloudways, changing the value in their control panel is usually the better route. Confirm with Manage here, and your next save stores the value like any other setting.
The field then reads “Your value is used instead of WP_REDIS_HOST from wp-config.php”, with Use the host value beside it to hand the setting back. The host’s constant takes over again immediately.