How to convert images to WebP
Convert your media library to WebP or AVIF and serve the modern format to browsers that support it — including images referenced from CSS, not just <img> tags.
JPEG and PNG are decades old. WebP typically cuts file size by 25–35% at the same visual quality, and AVIF goes further still. This tab converts your media library to those formats and serves them to browsers that support them, falling back to your originals for anything that doesn’t.
Where to find it
- In your WordPress admin, click xSpeed Cache in the left menu.
- In the xSpeed Cache sidebar, open the Optimization group.
- Click the Media Optimization card, then the Image Optimization tab.
Shortcut: open
wp-admin/admin.php?page=xspeed#/performance/lazy/imagesdirectly.⭐ This tab is part of xSpeed Pro.

- Server capabilities — which engines and formats your server supports.
Settings at a glance
| Setting | Default | What it does |
|---|---|---|
| Output format | WebP | One picker, not two toggles: Off (serve originals only), WebP, or WebP + AVIF. |
| WebP quality | 82 | Quality/size trade-off for WebP. Shown only when WebP is selected. |
| AVIF quality | 60 | Quality/size trade-off for AVIF. Shown only when WebP + AVIF is selected. |
| Serve WebP/AVIF for every image | On | Server-level rewrite covering CSS background images too. |
How it works
Conversion needs an image library in PHP — Imagick or GD. The Server capabilities card probes for both and shows which formats each can produce, with Re-probe to re-check after your host changes something.
Read this card before anything else. If neither engine supports a format, xSpeed can’t produce it, and that’s a hosting question rather than a settings one. On a well-provisioned server you’ll see both engines supporting both formats, as above.
Converting doesn’t replace your originals. WebP and AVIF copies sit alongside them, and the original is served to any browser that can’t take the modern format.
A conversion that doesn’t make the image smaller is thrown away. If the WebP or AVIF version comes out no smaller than the original — usual for logos, badges and other flat-colour graphics — it isn’t kept or served, and the image shows as kept as original. That’s the right outcome rather than a failure, and re-running won’t change it.
Choosing an output format
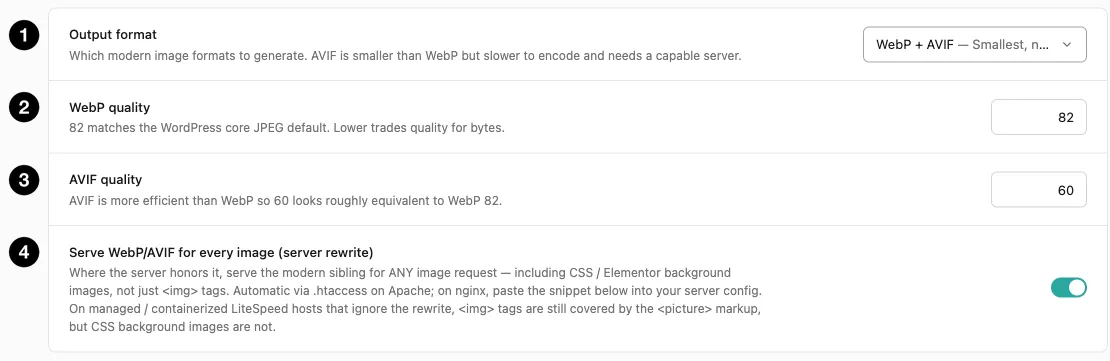
- Output format — which modern formats to generate.
- WebP quality — appears once WebP is selected.
- AVIF quality — appears only on WebP + AVIF.
- Serve WebP/AVIF for every image — the server-level rewrite.
Output format defaults to WebP: once the licence is active, new uploads get a WebP copy without you choosing anything. Pick Off to serve originals only, or WebP + AVIF to add AVIF. The trade-off between the two formats is real:
💡 82 is not a low number. WebP at quality 82 is generally indistinguishable from the original for photographs, which is why it matches the WordPress core JPEG default. Raise it only if you serve detailed artwork or graphics with hard edges, where compression artefacts show more readily.
| Format | Size | Encoding cost | Browser support |
|---|---|---|---|
| WebP | 25–35% smaller than JPEG | Fast | Universal among current browsers |
| AVIF | Smaller again than WebP | Noticeably slower, needs a capable server | All modern browsers, slightly narrower |
WebP is the safe default. AVIF gives better compression but costs significantly more CPU to encode — which matters when you bulk-convert a large library. If your server is modest, WebP alone is the sensible choice.
Quality defaults differ for a reason: WebP 82 and AVIF 60. Those aren’t inconsistent — AVIF achieves comparable visual quality at a much lower number, so the lower value isn’t a worse picture.
The server rewrite — the setting that matters most
Serve WebP/AVIF for every image is the difference between converting some of your images and converting all of them.
Without it, only <img> tags in your content get the modern format. Images referenced from CSS are missed entirely — and on a page-builder site that’s a lot: section backgrounds, hero images, decorative panels. Elementor in particular puts a great many images in CSS rather than markup.
With it on, the server serves the modern sibling for any image request, wherever it came from.
How it’s applied depends on your server, and there’s an important exception:
| Server | How |
|---|---|
| Apache | Automatic, via .htaccess. |
| nginx | Paste the provided snippet into your server config. |
| Managed / containerised LiteSpeed | The rewrite may be ignored. |
⚠️ On hosts that ignore the rewrite,
<img>tags are still covered — xSpeed falls back to<picture>markup for those. CSS background images are not. So on managed LiteSpeed you get partial coverage, and the images a page builder puts in CSS keep serving as originals. Worth knowing before you conclude conversion isn’t working.
Converting your existing library

- Convert existing images — how many images the library holds, how many are already converted, and how many are left.
- Convert library — starts the conversion in the background.
New uploads are converted as they arrive. For images already in your library, use bulk conversion — it runs in the background rather than blocking your admin:
wp xspeed images bulk startwp xspeed images bulk status reports progress and wp xspeed images bulk stop halts it. wp xspeed images caps prints the same capability probe the panel shows.
On a large library with AVIF enabled this is genuinely CPU-heavy — worth starting outside peak hours.
Oversized files from before
Files converted by an earlier version, or written by another image optimizer, may still be sitting in your uploads folder larger than the images they replace — which makes every page using them heavier, not lighter. The panel counts them and reports “N image(s) have a WebP/AVIF file larger than the original”. The count is taken from each image’s full-size file, so an affected image’s thumbnails may be affected too; on a library too large to scan whole, it’s an estimate scaled up from the oldest images.
xSpeed never deletes these on its own. Removing them is a separate, explicit choice: press Remove these files, then confirm with Delete and re-run. That runs the library conversion again, permanently deletes every WebP/AVIF file larger than its original, then re-converts those images and keeps a result only if it’s genuinely smaller. From the command line, the same run is:
wp xspeed images bulk start --prune-oversizedWithout --prune-oversized, a bulk run only counts oversized files. The cleanup can’t start while an ordinary conversion run is in progress — stop that run first.
⚠️ Two things to know before you delete. The
image.png.webpnaming is shared with ShortPixel and Imagify, so a file removed here may have been written by another plugin. And cached pages still point at the deleted file — a<picture>source that 404s doesn’t fall back to the original image, so it stays missing until caches are cleared. xSpeed clears its own page cache as part of the run; clear any other cache in front of your site, such as a CDN, afterwards.