How to set up Cloudflare Enterprise
Serve whole pages from Cloudflare's network with the add-on licence — two licence keys, four setup stages, the DNS records to add, and how purging and edge settings work afterwards.
Cloudflare connects your own Cloudflare account so xSpeed can clear its cache. Cloudflare Enterprise is a different thing: it puts your whole site on Cloudflare’s network, so most visitors are served a copy from a location near them and never reach your server at all. You don’t need a Cloudflare account — the plugin arranges everything, and all you do is add DNS records.
Where to find it
- In your WordPress admin, click xSpeed Cache in the left menu.
- In the xSpeed Cache sidebar, open the Network group.
- Click the Cloudflare Enterprise card.
Shortcut: open
wp-admin/admin.php?page=xspeed#/network/cloudflare-enterprisedirectly.⭐ This panel needs xSpeed Cache Pro and the Cloudflare Enterprise Add-on.
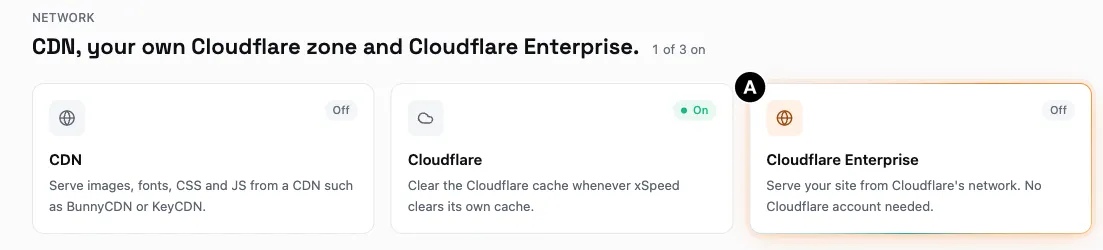
- A — Cloudflare Enterprise, beside CDN and your own Cloudflare connection.
What you need
Two licences, both on this site:
| What it is | |
|---|---|
| xSpeed Cache Pro | The plugin the add-on runs inside. How to install xSpeed Cache Pro covers it. |
| Cloudflare Enterprise Add-on | A separate licence key, $5 per domain, per month. It is a key, not a second plugin — there is nothing else to download or install. |
Until both are active, the panel opens on You need two things and does nothing else.
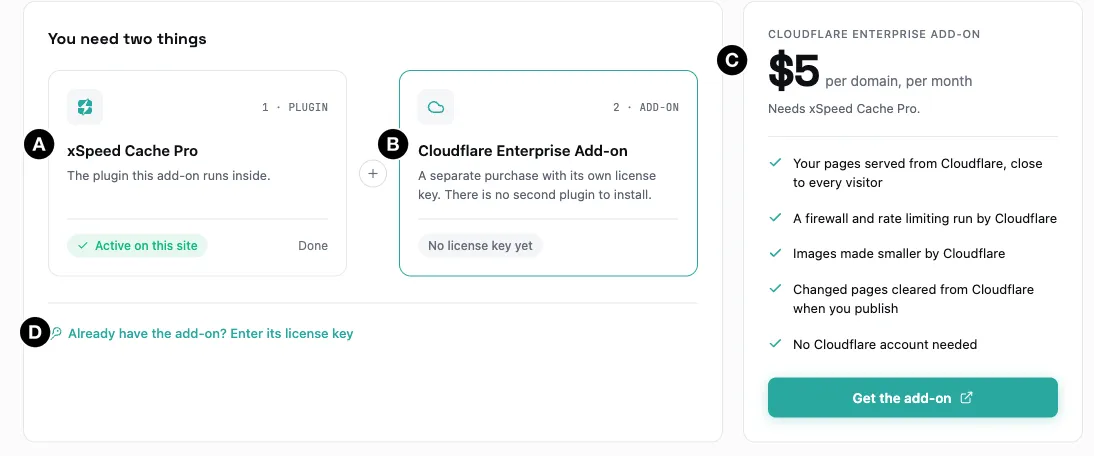
- A — xSpeed Cache Pro, and whether it is installed, licensed, or too old for the add-on.
- B — Cloudflare Enterprise Add-on, and whether its key is in place.
- C — The price and what the add-on brings, with Get the add-on.
- D — Already have the add-on? Enter its license key — this goes to the License page.
The pill beside the title follows the same two facts: Pro and add-on needed, Pro license and add-on needed, or Add-on needed. If your copy of Pro predates the add-on, step 1 reads Update needed instead and offers a button to your Plugins screen. Update Pro, then come back.
💡 There is nothing to buy from Cloudflare. The add-on covers the Cloudflare side. You never create an account, and there is no Cloudflare bill.
⭐ If your host is xCloud and you bought Cloudflare Enterprise there, you don’t need the add-on. See Sites where xCloud runs it below.
Entering the two keys
Both keys live on one page: xSpeed Cache → Settings → License. Find them in your WPDeveloper account.
- Paste the Pro key under xSpeed Cache Pro license and click Activate.
- Type the 6-digit code the store emails you, then click Verify. Resend if it doesn’t arrive.
- Paste the add-on key under Cloudflare Enterprise Add-on license and confirm it the same way.
With the add-on key active, the card reads License active — one step left and links to the Cloudflare Enterprise page.
If the key is refused, the card names the reason:
| The card says | What it means |
|---|---|
| That license has expired | Renew it. Nothing on the site has to change. |
| That license has been disabled | Contact support to find out why. |
| That license is not active for this site | It may already be in use on every site it allows. |
| That key is for a different product | The add-on’s key is separate from the Pro key. |
| That key was not recognized | Check it against your receipt and paste it again. |
⚠️ The add-on licence has no grace period. Pro keeps working for seven days after its licence expires; the add-on does not. The moment its key stops reading as valid, Cloudflare Enterprise stops. Renew it on the License page.
On a multisite network the key is shared by the whole network, and only a network admin can change it.
Setting up, stage by stage
Setup runs as four stages — Setup, Verify, Connect, Done — and each one opens only when the one before it is finished. You add DNS records twice, with a wait in between: about 15 minutes of work, plus up to an hour for DNS to spread.
You can close the page at any point. Setup carries on by itself and reopens at whichever stage you left it on; keeping the tab open only makes the checks run more often.
Stage 1 — Setup
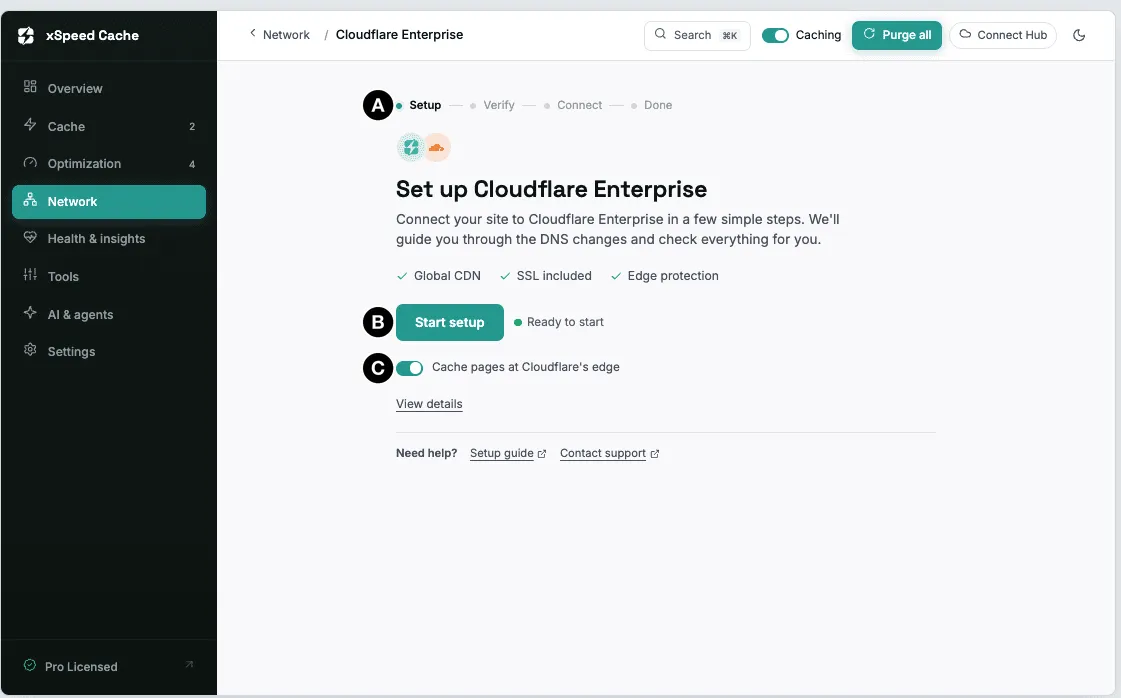
- A — The four stages, with the one you’re on marked.
- B — Start setup, with Ready to start beside it.
- C — Cache pages at Cloudflare’s edge, on by default.
Before it starts, the panel runs its own checks on the domain. They only look; they change nothing.
| Check | Passes when | If it fails |
|---|---|---|
| Your domain is online | The domain points somewhere | Point it at your server first. |
| Not using Cloudflare already | The domain doesn’t run through a Cloudflare account | In that account, set the record to DNS only (the grey cloud). If your host owns the account, ask them. |
| Your site works over HTTPS | Your server answers securely | Ask your host for a valid certificate. A server error here is a warning, not a stop. |
| This is your site’s address | The domain matches the site | A warning only — the bare domain and www are one site, and setting up either covers both. |
Fix what fails and run the checks again. If only the first or third fails and you know why, Enable anyway lets you continue — it is never offered for the Cloudflare check, because starting while the domain is already proxied cannot work.
Leave Cache pages at Cloudflare’s edge on. It is what makes Cloudflare hold whole pages rather than just images and scripts, and it follows your own rules: Cloudflare keeps a page for as long as your Page Cache expiry says, and the pages you exclude there are the pages Cloudflare never stores. You can change it later on the Performance tab.
Stage 2 — Verify
Two records prove the domain is yours and let Cloudflare issue its certificate. They are safe to add straight away — visitors are not affected by either.
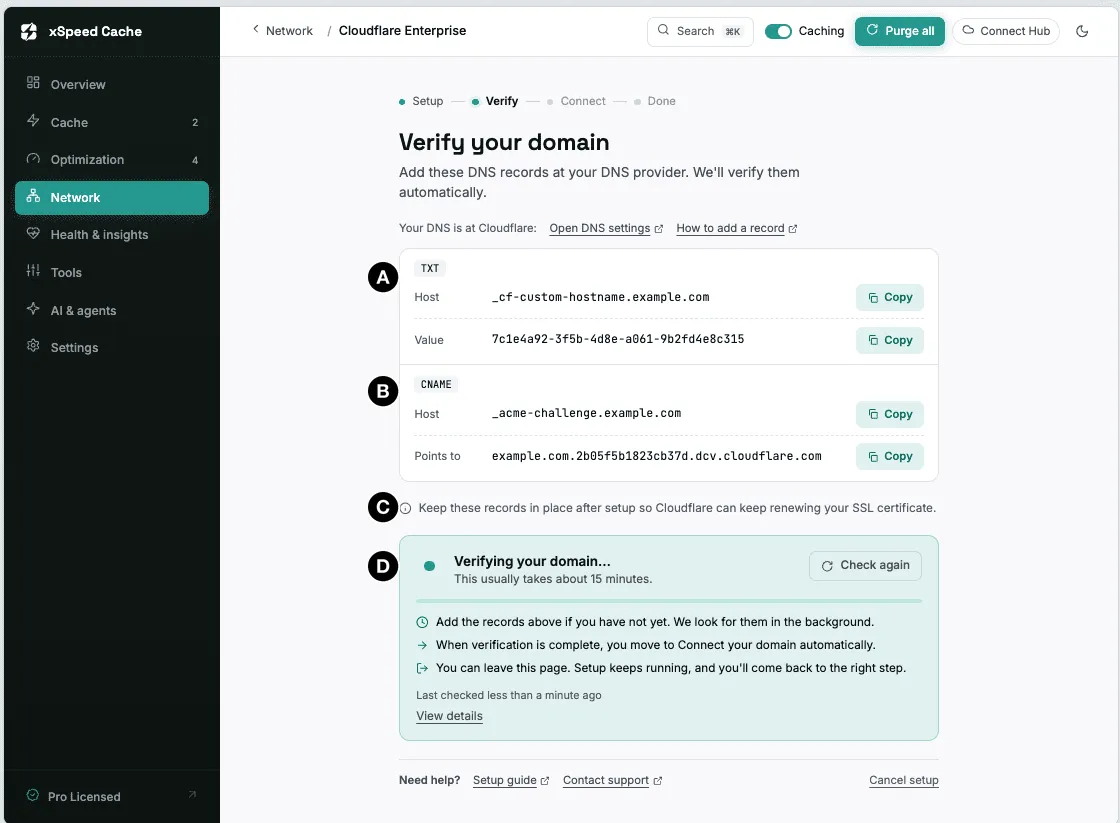
- A — The TXT record that proves you own the domain.
- B — The CNAME record that lets Cloudflare issue and renew the certificate.
- C — The reminder to keep both records afterwards.
- D — The progress box, with Check again and when it last looked.
Every host and value has a Copy button, and the values are different for every domain — copy them from your own panel, never from a guide.
| Record | Host | What it does |
|---|---|---|
TXT | _cf-custom-hostname.<your domain> | Proves to Cloudflare that the domain is yours. |
CNAME | _acme-challenge.<your domain> | Lets Cloudflare issue and renew the SSL certificate. |
⚠️ Keep both records after setup. The certificate renews through them. Delete them and the site keeps working until the day the renewal fails.
On a subdomain, such as shop.example.com, the records go in the DNS zone for example.com. Most providers add the zone name for you, so you type _cf-custom-hostname.shop and _acme-challenge.shop. The panel always shows the exact host to enter.
Verification usually takes about 15 minutes. While it runs, each record reports what the panel can see:
| Status | Meaning |
|---|---|
| Not checked yet | The first check hasn’t run. It will within a minute. |
| Not found at your DNS provider | The record isn’t there yet. |
| Added under the wrong name | Your provider appends the domain for you — enter only the part before it. |
| Found, but different | A record of that name exists with another value. Change it to the value shown. |
| Hidden by your DNS provider | Your provider answers the certificate check itself. See If your DNS is at Cloudflare. |
| Added. Spreading across the internet | Nothing to do but wait, usually under an hour. |
| In place | Done. |
Stage 3 — Connect
This is the stage that moves your visitors, and it stays locked until ownership and the certificate are confirmed. Switching earlier would show visitors a certificate error.
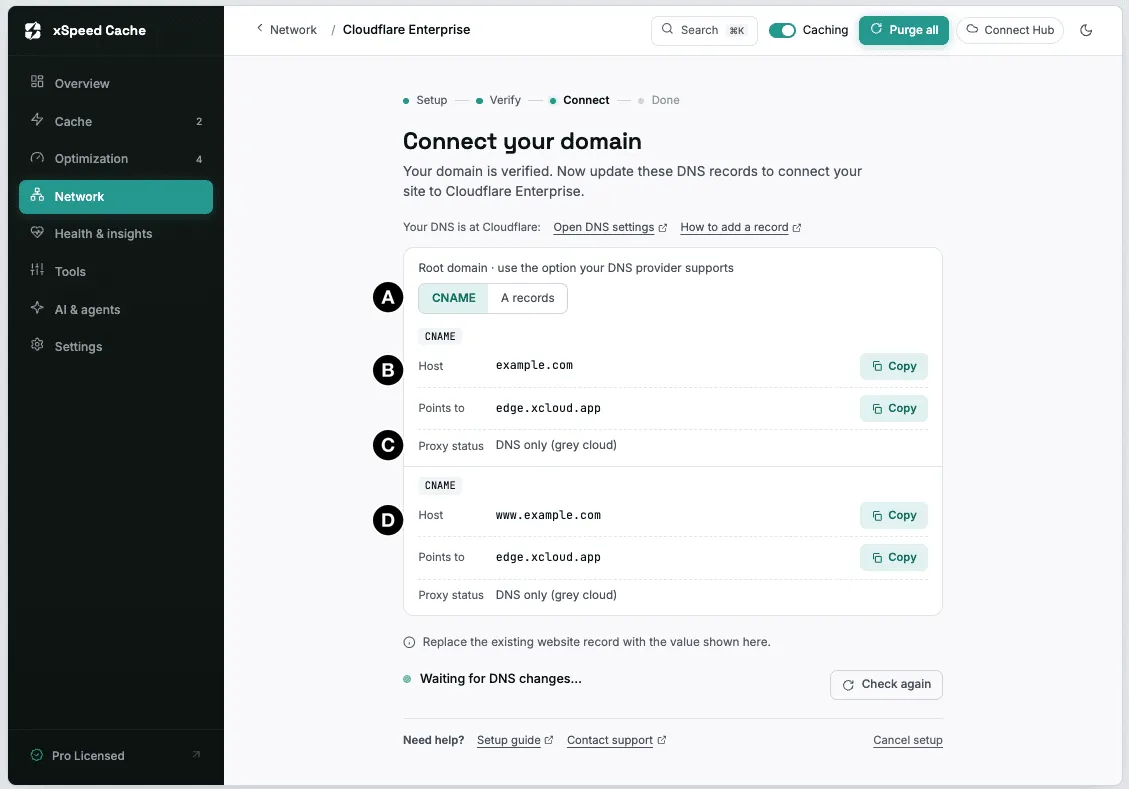
- A — CNAME or A records — pick whichever your DNS provider supports.
- B — The record for your main domain.
- C — Proxy status: DNS only (grey cloud), which matters if your DNS is at Cloudflare.
- D — The
wwwrecord, which is optional.
⚠️ Use one option, not both. A CNAME on the root domain where your provider allows it, or the two A records where it doesn’t. Adding both sends some visitors to the wrong place. When the panel knows your provider refuses root CNAMEs, it says so on the option you can’t use.
The www record is its own CNAME. Add it so visitors who type the www address go through Cloudflare too; you can add it later.
Before you change anything, the panel records what these names pointed at, under Your records before the switch — keep that, in case you ever move back to your own server. If an old record for the same name is still there, the panel names it and asks you to delete it first.
Each name then reports its own progress: Pointing at your server, Changed. Spreading across the internet, or Pointing at Cloudflare.
Stage 4 — Done
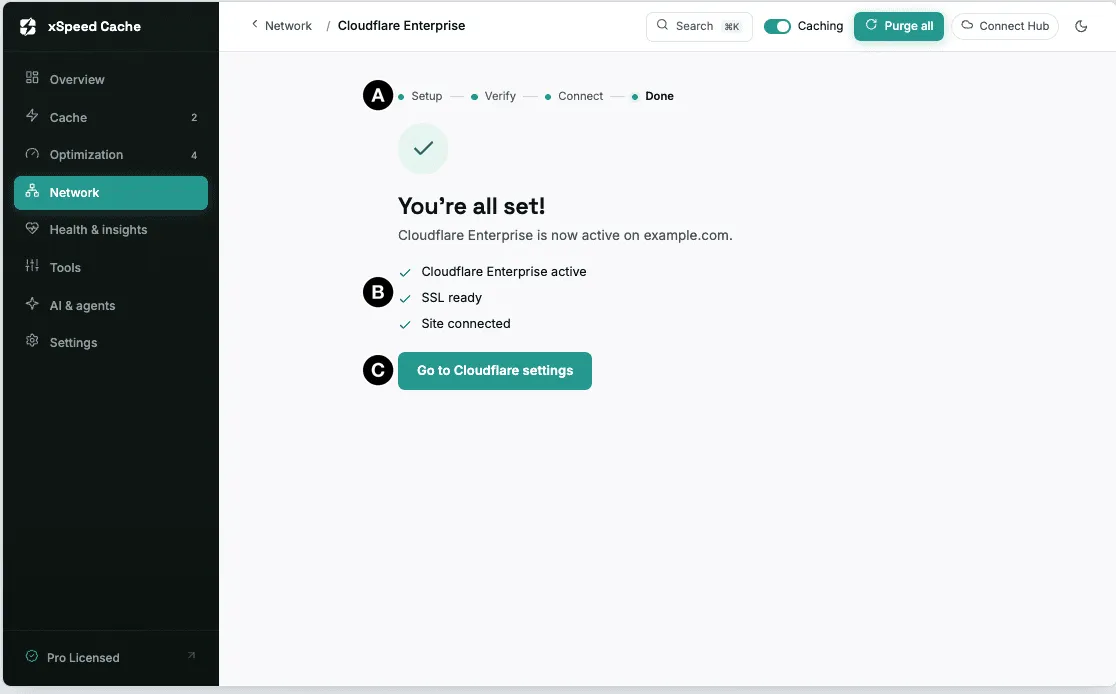
- A — All four stages complete.
- B — The three things that had to pass: Cloudflare Enterprise active, SSL ready, site connected.
- C — Go to Cloudflare settings, which opens the live panel.
Behind those three lines, four checks had to pass in order: Cloudflare confirmed you own the domain, the certificate is ready, visitors reach Cloudflare, and Cloudflare serves your pages. View details shows them individually with how long each has been waiting — useful when something stalls, because each one says whether it is your turn (Waiting for your records) or Cloudflare’s (Your records are in place, waiting for confirmation).
If your records are right and nothing has been confirmed after an hour, the panel says so and points you at support.
If your DNS is at Cloudflare
Two things to know when your domain’s DNS already lives in your own Cloudflare account.
Set every record this setup asks for to DNS only — the grey cloud. A proxied record puts your own account in front of Cloudflare Enterprise, and the setup fails. A proxied A record pointing at a Cloudflare address shows visitors Error 1000: DNS points to prohibited IP.
Turn off Universal SSL for the domain. Cloudflare’s own certificate service answers the certificate check before the record you added can be seen, so verification never completes. In your Cloudflare account, go to SSL/TLS → Edge Certificates, turn Universal SSL off for this domain, then click Check again. Leave it off: the certificate renews through the same record, and switching it back on can hide the record again.
💡 If the certificate step waits much longer than usual, the Connect stage offers Switch now anyway. Some certificates only finish once visitors reach Cloudflare. Use it only after a genuine wait — visitors may see a certificate warning briefly.
Day to day
Once the domain is live, most of this runs itself. Publishing or updating a post clears those pages on Cloudflare as well as locally, and Purge all in the top bar clears Cloudflare too.
The panel now has six tabs — Performance, Security, Advanced, Domain, DNS and Danger zone — and opens on Performance.
Purging
| Control | What it clears |
|---|---|
| Purge changed pages | The pages that changed since the last clear. On every tab, top right. |
| Clear everything on Cloudflare | Every cached page, image, script and style for the domain. Under More on the Domain tab, and it asks first. Visitors reach your server until the cache refills. |
The Last purge line records what happened, and whether it could be verified. If you see Old pages stay after a clear, Cloudflare was cleared but your host’s own server cache is still serving old copies — that one is for your host. On nginx the panel may offer Show the nginx block, which is the server rule that lets a purge stay narrow instead of emptying the whole site.
Edge settings
These are Cloudflare’s own switches, saved through the panel. A change takes about 20 seconds, after which the row says it is saved and Cloudflare is still applying it.
| Setting | Tab | What it does |
|---|---|---|
| Cloudflare page caching | Performance | Caches whole pages on Cloudflare. Your own page cache then serves only what Cloudflare asks for. |
| Caching | Performance | Caches images, CSS and JavaScript. Not needed while page caching is on, and the panel says so. |
| Early hints | Performance | Lets browsers start loading CSS and images before the page arrives. |
| Scrape shield | Performance | Hides email addresses on your pages from spam bots. |
| Image optimization | Performance | Off, Lossless or Lossy. Makes images smaller at the edge. |
| SSL cipher | Performance | Modern, Compatible or Legacy. Modern is safest; legacy keeps old browsers working. |
| WAF | Security | Blocks known attacks with Cloudflare’s managed firewall rules. |
| Rate limiting | Security | Slows any address sending more than 200 requests a minute, counted separately at each Cloudflare location. |
| Browser integrity check | Security | Blocks requests that look like bad bots. |
| Under attack mode | Security | Every visitor waits on a check page. For use during an attack only. |
| AI crawler blocking | Security | Stops known AI crawlers collecting your content. |
⚠️ Rate limiting counts your own tools too. Uptime monitors, cache warmers and anything else that hits the site hard from one address can trip it, and when it does they get a challenge page they can’t answer.
Some things need no setting at all: every domain gets Always Online, Tiered Cache, HTTP/3, Brotli and automatic HTTPS rewrites. And the Advanced tab’s Pages Cloudflare never caches follows your Page Cache exclusions rather than keeping a second list — edit them in Page Cache.
Is it working?
The Domain tab gives a plain verdict, plus the certificate, this month’s usage and the last purge.
| Verdict | Meaning |
|---|---|
| Serving from Cloudflare | All good. |
| On Cloudflare. Pages are still being cached. | Normal right after setup or a full clear. |
| On Cloudflare, but pages are not cached | The line beneath names the cause — usually xSpeed isn’t caching that page, or Cloudflare page caching is off. |
| Visitors do not go through Cloudflare yet | DNS still points elsewhere. |
| Cloudflare’s firewall blocked our check | Look at the Security tab — it may be blocking visitors too. |
| Your server answered with an error | Fix the error on your server. |
| We could not check your site from outside | Use the From your server row below it to check from the inside instead. |
The usage line reads x GB of y GB this month. It turns amber at 80% and red at 90% — not at 100%, because once the allowance runs out the domain can be taken off Cloudflare about a day later, and the warning has to arrive while there’s still room to act. Your site keeps serving either way, straight from your server.
License use this period lists the domains the add-on licence has covered. A domain you removed still counts until the licence renews.
What Health warns about
xSpeed Cache → Health & insights tests how Cloudflare treats pages xSpeed marks as do not store. On a healthy site the row reads Edge cache being told what not to store.
If it reads Cloudflare stores pages marked do-not-store, a test page sent with “do not store” came back from Cloudflare’s cache anyway. Cart, checkout and account pages can then reach the wrong visitor. With the add-on there is no Cloudflare account of your own to change, so this one goes to support — or to xCloud, if that’s where your Cloudflare Enterprise came from.
Removing the domain
Danger zone → Remove takes the domain off Cloudflare. Do it in this order and nobody sees downtime:
- Point the records back at your own server, at your DNS provider. The panel lists what they were.
- Wait for that change to spread.
- Come back, tick I understand my DNS must point back to my own server, and click Remove.
Your add-on licence is kept, so the domain can go back later without buying again — and if your site has moved to a new server in the meantime, setting it up again points Cloudflare at wherever the site is then.
Cancel setup does the same for a domain that never went live. If you haven’t changed the Connect-stage records, nothing changes for visitors; the verification records can be left or deleted.
If Cloudflare stops serving the site
| The panel says | What it means |
|---|---|
| Off Cloudflare | Cloudflare isn’t serving the domain right now, but your setup and records are kept. Put it back on Cloudflare re-checks the records, usually within a few minutes. |
| This domain is no longer on Cloudflare | If your DNS still points at Cloudflare, the site is unreachable until you change it. The panel shows Put your DNS back with the records the domain had before. Reconnect, where it is offered, keeps the domain and only issues new verification records. |
| This domain moved to another site | Another site proved it controls the domain. If you added records for Cloudflare, change them back. |
Multisite
On a network, the main site sets Cloudflare Enterprise up and a network admin makes the changes — putting the domain on Cloudflare, pausing it and removing it all affect every site on the network. A subsite that shares the main site’s domain says so, and once the main site is live it offers Purge this site’s pages, which is the one thing a subsite can do for itself. See How to manage a multisite network.
Sites where xCloud runs it
If your site is hosted on xCloud and you bought Cloudflare Enterprise there, xCloud runs it: the panel reads Cloudflare Enterprise is managed by xCloud with an Open xCloud button, and there is nothing to set up in the plugin. Edge settings and DNS live in your xCloud dashboard.
Clearing pages then goes through xCloud’s own purge plugin, and what reaches Cloudflare depends on whether that plugin accepts xSpeed’s purges yet. The panel says which case you’re in:
| xCloud’s plugin takes xSpeed’s purges | It does not yet | |
|---|---|---|
| A post you edit | Cleared on Cloudflare | Cleared on Cloudflare, by xCloud’s plugin |
| Home page, archives, feeds | Cleared on Cloudflare | Stay cached until they expire |
| Purge all in xSpeed | Reaches Cloudflare | Does not reach Cloudflare |
In the second case, ask xCloud to update its purge plugin.
From WP-CLI
wp xspeed cfe statuswp xspeed cfe takes status, preflight, enable, refresh, recheck, purge, resume, remove and verify, plus --domain=<domain> to name one. enable turns Cloudflare page caching on unless you pass --no-page-caching.
🔒 An AI agent can run
purgeon its own, but not the rest. Clearing a cache costs a slower next page; enabling, removing or re-pointing a domain changes where visitors go, so those stay with you. See the MCP server.